
Kindling Insights: Power BI on FHIR🔥
- IT_Nurse

- Apr 18, 2025
- 7 min read
Updated: May 2, 2025
As you may know, I'm currently enrolled in a graduate program at the University of Victoria, in Health Terminology and Interoperability Standards. I have completed two of the four required courses, and have learned a ton about Controlled Terminologies (CTs) like SNOMED CT and LOINC, and Health Information Exchange (HIEs) standards like HL7 v2 and FHIR. I decided to enroll because I have a background in (and love of!) health data visualization, and I understand the importance of ensuring visualizations are based on well governed, high quality data. CTs and HIEs play a huge role in improving data quality as they help ensure data is captured and communicated in a way that the meaning isn't lost in translation. So while I've been learning about these fascinating new concepts, I've been attempting to connect them to my existing knowledge because I find it's much easier to understand new concepts when they can be linked to something I already know.
Which brings me to today's project: Visualizing FHIR data in Power BI Desktop on my Windows laptop.
I'd like to go as far as I can with this idea, so the plan is that this will be Part 1 of a series of posts. This post will focus on:
Generating synthetic (aka fictional) patient demographic data (in FHIR JSON format) from Synthea
Installing and running a HAPI FHIR server, and loading the synthetic data to my FHIR server
Using my FHIR server as the data source for a Power BI report. This will include:
Using Power Query to expand and flatten the nested FHIR data
Visualizing the data in a Power BI report.
I realize it might have made more sense to start by generating static FHIR JSON files from Synthea and loading them directly into Power BI (skipping the HAPI FHIR server entirely), as this would have been significantly easier. However, I wanted to simulate a real-world FHIR environment where data moves from a source ➡️ a server ➡️ Power BI .
As time permits, future posts will look at bringing in additional clinical data such as encounters, conditions, allergies, and medications, hopefully in a way that I can incorporate what I have learned about CTs.
So let's get to it!
Disclaimer: These instructions were generated with the help of ChatGPT. I have had really good luck with ChatGPT helping me with similar personal projects in the past, and while it's not perfect, I really enjoy the experience of trial and error with the instructions it provides. So please take these instructions with a grain of salt...neither ChatGPT nor I are experts.
Part 1: Install and run a HAPI FHIR server:
Install Docker Desktop. This does require creating an account and signing up for a subscription, but the free version worked great for my use case. Docker is a bit like a virtual machine, that creates something called a 'container' that basically creates, locally on my laptop, a temporary copy of a FHIR server that I can play with.
Open the Docker Desktop application, and keep it running in the background.
Open a Command Line (in the Windows search bar, search for cmd) and run the command 'docker run -d -p 8080:8080 --name hapi-fhir hapiproject/hapi:latest'.
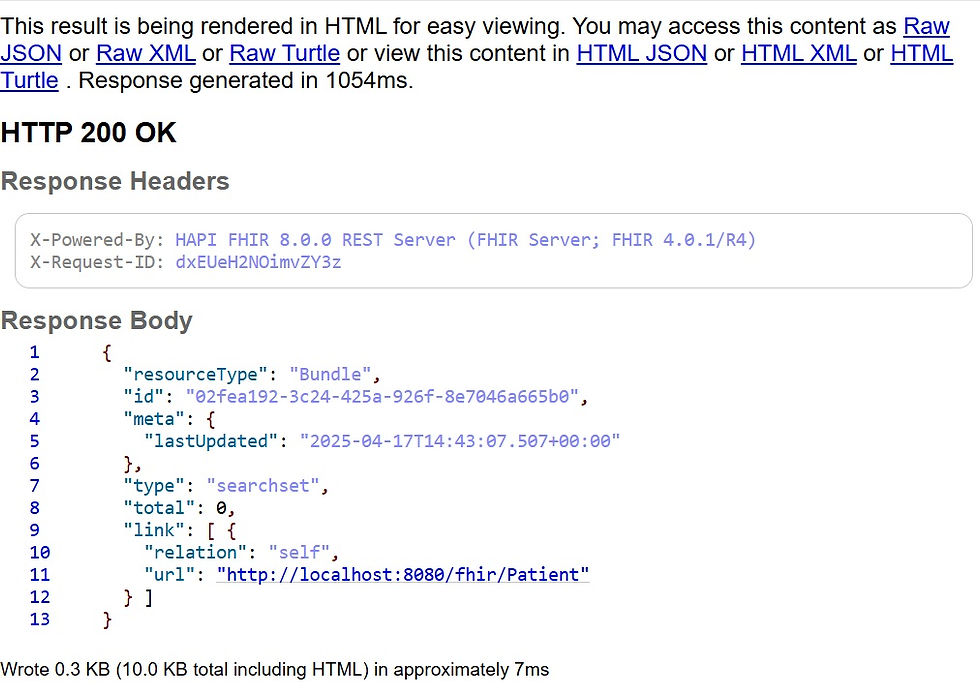
Wait 60 seconds, then open a web browser. Navigate to this address: http://localhost:8080. You should see something that looks like the screenshot below. If so, congratulations! You have installed a HAPI FHIR server and confirmed that it is up and running 🎉

If you would like to see a JSON Bundle with one example patient, go to http://localhost:8080/fhir/Patient. You should see something like this:
If you're like me and are new to this, you may run into trouble and want to reset your server and start from scratch. To do that you want to stop the server, remove the container (throw away the copy of the FHIR server that was created locally on my laptop), remove the volume (get rid of any data I had loaded to my server), then restart.
To stop your server and remove the running container: docker rm -f hapi-fhir
To remove the volume: docker volume rm hapi_data
To recreate a clean server: docker run -d -p 8080:8080 --name hapi-fhir -v hapi_data:/hapi-fhir-jpaserver-start/db hapiproject/hapi:latest
Part 2: Install Synthea, and generate synthetic data
Synthea is an open-source patient simulator that generates realistic but fictional health records in FHIR format. These include Patients, Conditions, Medications, Encounters and Observations, and it's all linked together.
Download the synthea-with-dependencies.jar file from this link: https://github.com/synthetichealth/synthea/releases. Create a folder for it on your hard drive (i.e. C:\Synthea) and put the jar file in that folder.
Open a command window, navigate to the folder (i.e. cd C:\Synthea) and run the following command to generate 10 patients: java -jar synthea-with-dependencies.jar -p 100
Note: If you get an error about Java not being recognized, you may need to download and install it. I downloaded it from here: https://adoptium.net/. Note that during the install process you will need to make sure to check the checkbox for 'Set JAVA_HOME variable' to ensure Java is added to your system PATH.
Look in your C:\Synthea folder. You should be able to navigate to output>FHIR and see 10 synthetic patient record json files. If you open one of them in Windows Notepad, it should look something like this:

If you have made it this far, congratulations! 🎉 You have successfully used Synthea to generate synthetic FHIR data.
Part 3: Upload patient records to local FHIR server
As mentioned previously, I wanted to simulate a real-world FHIR environment where data moves from a source ➡️ a server ➡️ Power BI . So the next section involves using a Python script to upload the patient records we just generated to our local FHIR server. If you don't have experience with running Python scripts on your computer, I would recommend following along to the instructions in these two videos: How to Install Python on Windows 11 and How to Run Python Programs on Windows 11. You will also need to install the os and requests libraries by installing and using pip. This video has great instructions you can follow. Once you've completed these prerequisites, you can move on to the steps below:
Open Windows Notepad and paste in the following code:
import os
import requests
# Set the folder path where Synthea saved its FHIR JSON output
# Each .json file represents a FHIR resource or bundle
folder_path = r"C:\synthea\output\fhir"
# Set the base URL of your local HAPI FHIR server
# NOTE: This should be the root FHIR endpoint (not /Patient or /Bundle)
server_url = "http://localhost:8080/fhir"
# Loop through all files in the specified folder
for filename in os.listdir(folder_path):
# Only process files that end with .json
if filename.endswith(".json"):
# Create the full file path
file_path = os.path.join(folder_path, filename)
# Open and read the file content as a string
with open(file_path, 'r', encoding='utf-8') as f:
resource = f.read()
# Define headers to indicate we're sending FHIR-compliant JSON
headers = {
"Content-Type": "application/fhir+json"
}
# POST the content of the JSON file to the FHIR server
# This works best when the file contains a full FHIR resource or transaction bundle
response = requests.post(server_url, data=resource, headers=headers)
# Print the filename and the HTTP response status code (e.g., 200, 201, 404, etc.)
print(f"{filename}: {response.status_code}")
Save the file in your C:\Synthea folder with the filename upload_fhir.py
Open a command window and navigate to C:\Synthea. Run the following command: python upload_fhir.py.
Note: If you watch the output of the script as it runs, you may notice that the response status code at the end of each patient shows 404. This means that those patients didn't upload successfully to the FHIR server. Out of my 100 patients, only 39 of them were successfully uploaded. This is a problem that I spent several hours troubleshooting without any luck. Since at least some of the patients loaded I decided to forge ahead, and stick this issue in my 'parking lot' to investigate further in the future.
Open a web browser and navigate to http://localhost:8080/fhir/Patient. If you can now see more than one patient, then congratulations! 🎉You have successfully uploaded patients to your FHIR server.
Part 4: Visualize the data in Power BI
We are on the home stretch! This is the last section. If you don't have Power BI Desktop installed on your computer, it is available as a free download from the Microsoft Store.
Open Power BI Desktop. Click on Get data from another source.

Search for Web, choose it, and click continue.

In the URL field paste in the following: http://localhost:8080/fhir/Patient?_count=100 and click ok.

The Power Query Editor should launch, and you should see something like this:

Click on the Home tab. From there, click on the Advanced Editor button. In the Advanced Editor window, replace the code with the code shown below this screenshot and click Done:

let
// Step 1: Load and extract patient entries
Source = Json.Document(Web.Contents("http://localhost:8080/fhir/Patient?_count=100")),
PatientEntries = Source[entry],
PatientTable = Table.FromList(PatientEntries, Splitter.SplitByNothing(), null, null, ExtraValues.Error),
ExpandedTopLevel = Table.ExpandRecordColumn(PatientTable, "Column1", {"fullUrl", "resource"}, {"FullUrl", "Resource"}),
// Step 2: Expand core resource fields
ExpandedResource = Table.ExpandRecordColumn(ExpandedTopLevel, "Resource", {"id", "gender", "birthDate", "address", "maritalStatus", "telecom", "name"}, {"ID", "Gender", "BirthDate", "Address", "MaritalStatus", "Telecom", "Name"}),
// Step 3: Extract and flatten name
ExpandedNameList = Table.ExpandListColumn(ExpandedResource, "Name"),
ExpandedName = Table.ExpandRecordColumn(ExpandedNameList, "Name", {"given", "family"}, {"GivenNames", "FamilyName"}),
CombinedGivenNames = Table.TransformColumns(ExpandedName, {{"GivenNames", each Text.Combine(_, " "), type text}}),
// Step 4: Expand and flatten address
ExpandedAddressList = Table.ExpandListColumn(CombinedGivenNames, "Address"),
ExpandedAddress = Table.ExpandRecordColumn(ExpandedAddressList, "Address", {"city", "state", "postalCode", "country"}, {"City", "State", "PostalCode", "Country"}),
// Step 5: Expand telecom and format display
ExpandedTelecomList = Table.ExpandListColumn(ExpandedAddress, "Telecom"),
ExpandedTelecom = Table.ExpandRecordColumn(ExpandedTelecomList, "Telecom", {"system", "value"}, {"TelecomSystem", "TelecomValue"}),
// Step 6: Expand marital status text
ExpandedMaritalStatus = Table.ExpandRecordColumn(ExpandedTelecom, "MaritalStatus", {"text"}, {"MaritalStatus"}),
// Step 7: Clean up birth date and calculate age
ParsedBirthDate = Table.TransformColumns(ExpandedMaritalStatus, {{"BirthDate", each try Date.From(_) otherwise null, type nullable date}}),
AddedAge = Table.AddColumn(ParsedBirthDate, "Age", each if [BirthDate] <> null then Number.RoundDown(Duration.Days(Date.From(DateTime.LocalNow()) - [BirthDate]) / 365) else null, Int64.Type)
in
AddedAge
You should now see your patient records! From the home tab, click on Close and Apply.
Visualize your data! Here's what I came up with:

And that brings us to the end of Part 1 of this project. Next up, I want to continue troubleshooting the issue I'm having with posting my patients to my FHIR server, and I'd also like to bring in data from different FHIR resources like encounters and observations.
If you have any thoughts or feedback about what I came up with, or how I went about it, I would love to hear in the comments section below. I'd also love to know if you have any related projects you would like to share. In any case, hope you have a fantastic day!
Lisa

Comments